I remember very little about my childhood. (Heck, these days I can barely remember what I did last week.) I have snippets of memories—running down our street yelling Cowabunga!, sledding with my sister, breaking my arm. We didn’t have a camera growing up, so memory-jogging photos are few and far between. Because I have a sister, my parents often blur our childhood milestones together.

When I had my daughter, I wanted her to live a better documented life. I wanted to remember Nikky’s tiny feet and funny first words when she became a sassy teenager. And I wanted her to have a record of her earliest years and the adventures we had.
My parents tell me that they took me places and made Super 8 movies of it all—film that I’ve never seen. For Nikky, I wanted something a little easier to deal with, and more likely to survive changing technology.
So I decided on a printed photo book.
I’d experimented with a few before, cobbling them together with the help of services such as Picaboo, Snapfish, or Shutterfly. Now I use SmileBooks to create an annual 12x12-inch coffee table-quality record of my daughter’s year. Many of the pictures that fill it come from my Windows Phone.
It’s a year-long project that I work on a little bit each month. If you’ve been meaning to do something like this, read on to learn my tips on how to actually make it happen.
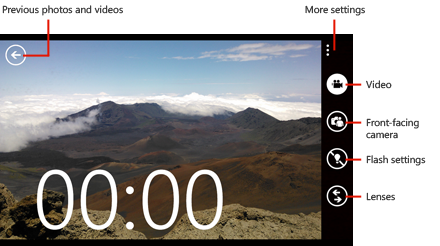
1. Check your camera settings. If you plan to print 12x12, 12x24, or larger size photos, make sure your phone’s camera is set to the highest or best resolution available. From the camera app, tap More (…) and then tap Photo Settings.

2. Take lots of photos. My Nokia Lumia 920 is my go-to camera to capture my daughter’s life as it unfolds. It’s always in my pocket or purse, and being able to instantly turn on the camera by pressing the camera button while it’s still locked means I rarely miss a picture. It takes amazing low-light photos, so I can capture even more with it. The new Lenses feature of Windows Phone 8 makes it easy to add cool effects or fix shots right on my phone.
3. Take notes during the month. Write down funny quotes, movies you watched, places you went, etc. If you share your life on Facebook, your status updates could be your notes.

4. Type it up while it’s fresh in your mind. For me, that’s at the end of every single month, without fail. I also send it out in a monthly email to my family and some close friends so they can keep up on what’s going on.
5. Sort photos monthly. If you wait until the end of the year, the task of picking photos for your book can easily overwhelm you. So I select the best 20 to 30 shots each month and upload them to SkyDrive. By uploading curated photos to SkyDrive, I also free up more room on my phone for new shots and video, but still have access to the uploaded shots from the Photos Hub.

6. Set aside time to compile the book.The hard work has already been done and now the fun part begins. I usually spend a few hours a day for about a week creating my book. I copy and paste in the text from those email updates throughout the year. Then I go to SkyDrive and the monthly folders with the best photos. In SmileBooks, I select the layouts that I want, make the text fit, and experiment with arranging the photos on full- or double-page spreads.
7. Buy it and enjoy. Every year, I order two copies. (SmileBooks has great promotions, so I usually hold out for a deal). One is for me and my daughter, the other is for my in-laws. We enjoy reading the books throughout the year to re-live our fun memories.

My dad, by the way, is finally digitally encoding our family’s Super 8 home movies. His technique is really low-tech: He’s projecting them on a wall and recording them with a digital camera. Still, my daughter is mesmerized by them. She’ll watch for hours, then pepper me with questions: “Mommy, do you remember the time you chased the dog? Fell in the water? Jumped into the pool?”
I look forward to showing her kids the stories and photos from her own childhood.
DIGITAL JUICE
No comments:
Post a Comment
Thank's!