Despite the world's rapid move to other means of communication—text, instant messaging, and social networking services—we still rely on email. Given email's importance and how long the technology has been around, it’s surprising to see the problems many people continue to have with sending, receiving, and filtering email. Let’s clear up some of those problems now.
Avoid embarassing message mix-ups
One thing that can create an enormous pothole in your road to success is sending a scathing message to the wrong recipient. For example, say you’re having a problem with the boss. You complain to a coworker about it in an email message, you carelessly overlook the fact that autofill has inserted the boss’s name (Jane Jones) instead of the intended recipient's name (Jane Smith) into the To: field, and you blithely press Send. Had you taken the following preventive measure, you wouldn’t now be cleaning out your desk.The trick is to open the Contacts application (or Address Book, if you’re running OS X Lion or earlier) and select Card -> Add Field -> Edit Template. In the Template window that appears, click the Add Field pop-up menu, select Nickname, and close the Template window. Select your boss’s contact entry, and click the Edit button at the bottom of the page. In the nickname field enter “Boss,” delete the boss’s first and last name, and click Done.
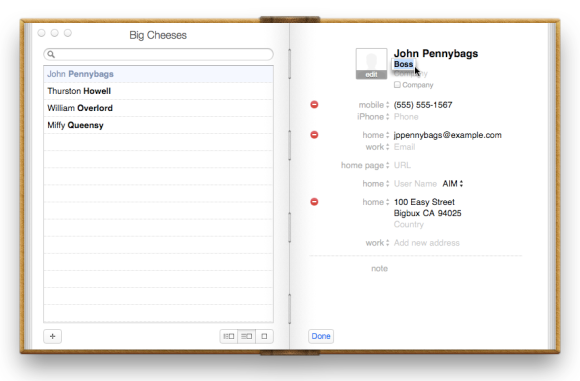 Avoid message mix-ups by assigning nicknames to contacts who have similar names, such as your boss and your best friend.
 Return to Mail, choose Window -> Previous Recipients, select your boss’s name in the list, and delete it. This action will prevent Apple Mail from autofilling with your boss's name. Now, when you want to send a message to the boss, simply enter “Boss” in the To field rather than his or her name. The message will go to the correct recipient, and you’ll keep your job.
See the same messages on all devices
One clue that we’re no longer living in the '90s is that we now access our email not from a single computer planted in an office or den, but from a multitude of devices—a work computer, a home computer, an iPhone, an iPad, an iPod touch, and so on. And few things are more frustrating than finding some of your email on one device but not on another. Likewise, you might encounter email that you deleted on one device that stubbornly reappears on another.The easiest way to manage this problem is to transition away from any POP (Post Office Protocol) email accounts you have to an IMAP (Internet Message Access Protocol) account. The major difference between the two is that with an IMAP account any changes you make on one device—such as deleting email or moving messages to a folder—will be reflected on other devices. So, for example, if on your iPhone you delete a message from Joe, when you access that account with your Mac’s email client, you won’t see Joe's message because you’ve already taken care of it. In contrast, with a POP account, you manage your email after you’ve downloaded it to your device; in this case, if you delete a message, you’ve deleted it only on that device, and when you view your email on a different device, the message remains.
These days it’s almost impossible not to create an IMAP account by default. When you sign up for iCloud, Gmail, or Yahoo, you get an IMAP account (although you can create a Gmail POP account for free, and one on Yahoo if you pay for its $20-per-year Mail Plus service). Many ISPs also offer IMAP accounts as the default. If you’ve had the same email account for years, however, you may still be on POP; if so, check out our tips for converting a POP email account to IMAP, or contact your ISP.
Save yourself from spam
Junk mail is another age-old problem, but it’s now compounded because we’re receiving email on multiple devices. Most Mac email clients have some variety of spam filtering built in, and if that filtering proves to be inadequate, you can solve the bulk of your junk-mail problems by using C-command’s $30 SpamSieve. In contrast, iOS devices don’t offer any variety of message filtering, which can lead to a spick-and-span Mac but a junk-encrusted iPhone.The most effective way to solve this problem is to set up an IMAP account, as I just discussed. Gmail, iCloud, and Yahoo have solid server-side spam filtering (AOL, regrettably, does not). These services will remove junk messages from your Inbox before you see them. The messages aren’t entirely gone, however (and that’s a good thing, since you don’t want misidentified messages vaporized without your say-so). Rather, they move to a Junk or Spam folder that you can access from your iOS device by launching the Mail app, scrolling down to the Accounts area, tapping an account (Gmail, for example), and then tapping the Junk or Spam filter. Once you’ve eyeballed these messages, you’re welcome to delete them as you would any other message.
Don't bounce messages
One thing that will not help reduce your spam is bouncing messages back to the sender. At one time the Mac’s Mail application had a Bounce command that would return a message to its sender along with some legitimate-looking text indicating that the account the message was sent to was inactive. That feature has been removed, for good reason. Spammers are smart enough not to put their real return address in the message. When you bounce a message, you’re either sending it to a fake address or, worse yet, sending it to some poor schmo who has had his address spoofed by spammers. These days bouncing only exacerbates the problem. Please don’t do it.Speed up your email by archiving old messages
If you’ve been carting around several years' worth of email, you may find that your email client runs slowly or crashes from time to time. Email applications are fairly robust, but when tasked with keeping track of gigabyte upon gigabyte of messages and their attachments, even the best can act up. To lend your email client a hand, clear out the cruft.This doesn’t mean entirely trashing email that’s important to you. Instead, you simply want to get it out of your email program and into an archive that you can access later if necessary. In Apple Mail, just Control-click a mailbox or folder, and choose Export Mailbox. Select a destination for the archive that the program will create from the messages within that mailbox. Once Mail creates the archive, select the mailbox or the messages within that mailbox, and delete them.
This procedure is more easily done in Microsoft Outlook. Simply select the mailbox you want to archive, and drag it to the desktop; an mbox file containing the mailbox’s messages will be created. Now, within Outlook, delete the contents of that mailbox.
Keep old email in another app
Speaking of archived email, it doesn’t make a whole lot of sense to import thousands of messages only to read a single one, thus cluttering up the email client that you just cleaned out. Although you can read mbox files with a text editor such as Apple's TextEdit, you have a better way: Use a different email client to read your archived email.I suggest Mozilla Thunderbird for this purpose since it’s free and, with the help of an add-on, able to import mbox files.
Download and install Thunderbird. From the Tools menu, choose Add-ons. In the Add-ons search field, enter ImportExportTools. Click the Install button next to the add-on that appears. Thunderbird will download and install the add-on. Click the Restart Now link to restart Thunderbird.
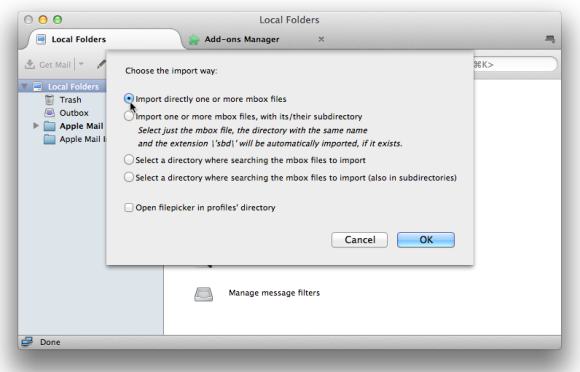 Use an email client such as Thunderbird to import and read your old email messages.
 From the Tools menu choose ImportExportTools -> Import Mbox File. In the sheet that appears, be sure that the Import Directly One Or More Mbox Files option is enabled, and click OK. In the navigation window that appears, locate your mbox file of archived mail, click the Open button, locate the file called mbox within, and click Open again. The contents of the mbox will be added to Thunderbird.
Now, when you need to read old mail, simply fire up Thunderbird and use it to do the job. Your regular email client will thank you.
DIGITAL JUICE
No comments:
Post a Comment
Thank's!