Congratulations, you’ve braved the lines, delivery wait times, or in-store negotiations to snag yourself a brand-new iPhone 5. But before you get to playing with your new device, you’ll probably want to get to know it and set it up. Thanks to iOS 6’s step-by-step activation process, Apple’s made it pretty simple to get started; but just in case you need some extra help, we’ve put together a comprehensive guide for activating your new iPhone, transferring data from your old phone, and some suggestions for exploring its new features.
Meet your iPhone 5
Get acquainted with the iPhone 5’s hardware features: every button, switch, slot, port, and plug. Designed with a minimalist aesthetic, the aluminum-and-glass iPhone 5 eschews a button-heavy design in favor of simple controls and a slim figure: It’s a mere 7.6mm thick and weighs only 112 grams. Here’s a quick rundown of all the features on the device’s exterior.

A) On/Off Button
Press the On/Off button to turn the device’s screen on or off. You can still take calls, play music, and receive notifications with it off, but the screen stays blank until you wake it by pressing this button or the Home button. To turn the device off, hold the On/Off button down until the screen dims and the red Slide To Power Off slider appears. Slide your finger across the switch, and the iPhone powers down. (To turn your device back on, press and hold this button again until the Apple logo appears.)
You can also decline or silence calls, alerts, and alarms with the On/Off button; press it once to silence an incoming alert or call; press it twice in succession to send the caller to voicemail.
B) Front-Facing FaceTime HD Camera
This 1.2-megapixel camera can shoot 1280 by 960 pixel stills and 720p HD video (1280 by 720 pixels). This camera was designed primarily for using FaceTime and snapping quick self-portraits.
C) Receiver
With no headphones plugged in, this is where you place your ear to listen to incoming calls. Depending on your region, the iPhone 5 may use wideband audio during telephone calls, which increases the vocal frequencies and provides for better-sounding conversations.
D) Touchscreen Display
The new iPhone sports a diagonal 4-inch Multi-Touch display, an improvement over the previous iPhone’s 3.5-inch display; those touch sensors are integrated directly into the display, reducing sunlight glare and keeping the iPhone’s figure slim. Its 1136-by-640-pixel Retina display packs 326 pixels per inch into the space allotted. The display is made from optical-quality glass, which makes it highly scratch resistant. It also has an oil-resistant oleophobic coating that makes it easy to wipe off smudges.

E) Home Button
The only physical button on the face of the iPhone, the Home button provides a variety of shortcuts for accessing apps and iOS features.
Single-Press: A single-press of the Home button can have several results, depending on what you’re using the iPhone for at the time: If the phone is in sleep mode, pressing the Home button wakes the iPhone; if you’re in an app, it returns you to the home screen; if you’re on a subsequent home screen page, it returns you to the first page; and if you’re on the first home screen page, it brings you into the iPhone’s Spotlight search mode.
Single-Press and Hold: If you press and hold the Home button for at least two seconds, that activates Siri.
Double-Press: When the phone is locked or in sleep mode, a double-press of the Home button wakes your device and brings up both the iPod controls and a shortcut for the Camera app. In active use, it brings up the multitasking bar, showcasing your active apps.
F) Headphone Jack
The new iPhone has a standard 3.5mm audio jack, located on the bottom of the device. Apple includes a set of white EarPods that allow you to listen to audio and speak on a call, but you can also use any pair of third-party headphones instead.
G) Microphone
One of the iPhone 5’s three microphones is located on the bottom left of the device. (The other two, which are designed to filter out noise, are located on the front and back.) Unless you’re using an external microphone, you’ll speak into these when making calls, recording voice memos, talking to Siri, and more.
H) Dock Connector
The iPhone uses Apple’s new Lightning dock connector to connect to your computer and other accessories. Unlike the 30-pin connector, it’s reversible, so you can plug it into your phone in either direction. As this is one of the first Apple devices to use a new connector, it won’t work with older third-party accessories without an adapter.
I) Speaker
On the bottom right of the new iPhone is a small speaker that’s responsible for projecting speakerphone calls, music, movies, game noises, and any other miscellaneous noise. Because your device has just one speaker, it plays all audio in mono (on a single channel).

J) Back Camera and LED Flash
On the back of the iPhone 5 is the second of two cameras, as well as an LED flash. The camera sports an 8-megapixel CMOS backside illumination sensor, which snaps pictures at 3264-by-2448-pixel resolution. (In real-world terms, that would translate to a high-quality 8-by-10-inch glossy print.) An attached hybrid IR filter provides better color accuracy, while the f/2.4 aperture offers improved low-light performance. The iPhone 5 camera sports a sapphire lens cover for sharper images. The iPhone’s back camera also captures 1080p high-definition video at up to 30 frames per second, with real-time video image stabilization and temporal noise reduction.
K) Ring/Silent Switch
The Ring/Silent switch—found on the left side of the device—does pretty much what you’d suspect: Flick it backward to silence the phone, forward to activate the ringer. When you switch to Silent mode, you reveal a small orange stripe on the switch, and your device vibrates. Silent mode silences only rings and alerts, however; you can still play music and game sounds through the speaker.
L) Volume Up and Volume Down Buttons
Directly below the Ring/Silent switch is a pair of volume buttons. Press the plus-sign button (+) to increase volume and the minus-sign button (–) to decrease volume. In the Settings app, you can choose whether these buttons affect only noises from an app, or whether they control systemwide sounds as well. In the Camera app, the plus-sign button also works as a physical shutter button.
M) SIM Card Slot
The new iPhone can operate on multiple cellular bands, thanks to its dynamically switching on-board radio: various bands of the LTE cellular data standard, HSPA+, DC-HSDPA, GPRS, EDGE, CDMA-EvDO, and HSPA. Major U.S. partners for the iPhone 5 include AT&T, Sprint, and Verizon.
When you purchase a new iPhone, you can do so in one of two ways: with a cellular carrier contract or contract free. The first option lets you receive a significant discount on the phone, but you have to use your iPhone solely with that carrier for two to three years, depending on your carrier and region. Contract-free phones allow you to use any carrier’s pay-as-you-go plan but are several hundred dollars more expensive up front. Either way, you’ll need a carrier to talk on your iPhone and use cellular data.
Your iPhone needs a nano-SIM card to connect to a cellular provider. Without it, you won’t be able to access call networks or cellular Internet, only Wi-Fi. If you sign up for a contract when you purchase your device, this SIM card comes preinstalled. You can see Apple’s full list of supported spectrum bands on Apple’s iPhone webpage under “Cellular and Wireless.”
If you have a contract-free phone and need to install a nano-SIM—or you need to access your current nano-SIM card—you can remove it by sticking one end of a paper clip into the hole next to the SIM card slot.

Headphones
Your device comes equipped with a set of earbuds with a microphone and remote built onto the right-side cable that can control volume, change tracks, and answer and end calls. You can use these controls to perform a variety of actions with the right combination of taps.
Single-Click: Clicking the center button of the remote once while listening to music or watching a video pauses playback; if you’re receiving a call, a single-click answers it, and another single-click hangs up when you’re finished.
Single-Click and Hold: When you’re receiving an incoming call, a single-click and hold declines the call and sends it directly to voicemail; while you’re on a call, you can do this to switch to a secondary call. Otherwise, holding down on the remote activates Siri.
Double-Click: Squeeze twice, and your song skips to the next track.
Triple-Click: Squeeze three times to skip back to the previous track.
Transfer your data
You’ve moved to the latest and greatest in the iOS world, and to do so, you’re leaving your old device behind. But before you send it off on its last voyage, you have to decide whether you want to transfer its data to your iPhone 5. Here are the various ways to do so, depending on whether you’re moving from an old iPhone, a different smartphone, or a feature phone.
Upgrade from an older iPhone
If you’re upgrading from an older iPhone, you can transfer all its apps, data, and settings to your iPhone 5. But to do so, you’ll need to make a backup (via iTunes or, if you’re running iOS 5, via iCloud) of your information.
 Control-click your device in iTunes to bring up the Back Up option.
Make a backup using iTunes: If your old device is running iOS 4 or earlier, an iTunes backup is the way to go. To update your backup (or to create a new one) connect your old device to the computer you normally sync it with via USB, open iTunes, select the device, and press the Sync button. You can also create a backup by control-clicking on the device in the iTunes Source List and selecting Back Up from the drop-down menu.
Make a backup using iCloud: If you’re running iOS 5 or iOS 6 on your old device and you have an iCloud account, you can alternatively take advantage of iCloud Backups to save your data. Your device will automatically make an iCloud backup once a day while locked, plugged in, and connected to a Wi-Fi network, but you can manually force a backup whenever you’re on Wi-Fi by opening the Settings app on your device. Navigate to iCloud > Storage & Backup, and make sure the iCloud Backup switch is toggled on. From there, you just have to tap on Back Up Now to start the process. (You should note that iCloud backups can sometimes take significantly longer than iTunes backups, so it may not be the best option if you’re in a hurry to set up your new phone.)
Upgrade from another smartphone

Moving from an Android, BlackBerry, or Windows smartphone to the iPhone 5? Depending on how you’ve set your information up, it should be relatively painless to transfer it to your new device.
Mail, contacts, and calendars: If you’re using a Gmail account or other POP or IMAP-based account for mail on your smartphone, it’s already syncing to a central server, and you should be able to add that account to your new iPhone with few issues. Apple’s iOS has automatic setup for those using Microsoft Exchange, Gmail, Yahoo, Aol, or Hotmail; you’ll also be able to manually set up a POP or IMAP account for mail, LDAP or CardDAV for contacts, or CalDAV for calendars. You can alternatively use Apple’s free iCloud service to set up a new email account.
Music, videos, and photos: Your new iPhone uses iTunes to sync any local music, TV, movies, and photos from your computer to the device. If you’ve been syncing that information with your smartphone, it’s easy enough sync that data with your Apple device—you just have to know where the content is located on your smartphone and get it over to your computer. Once you’ve done that, add it to iTunes; to sync your photos, add them to iPhoto or Aperture (on a Mac) or place them in your Pictures folder (on a PC).
If you’ve purchased content through your smartphone that hasn’t been copied to your computer (say, if you’re using Amazon Cloud Drive), you should be able to download it to your desktop system, or, at the very least, install an app on the iPhone (like the Kindle app for book purchases) that lets you access the information.
Apps and miscellany: Unfortunately, you can’t port any Windows or Android apps from your old device to your iPhone. On the upside, you may be able to find parallel versions of those apps on Apple’s App Store (for instance, if you’re using Dropbox on your smartphone, you can download the company’s iOS app and continue to access your Dropbox data). If you have apps with valuable information you don’t want to lose (notes apps, to-do lists, etc), you can poke around to see if there’s any way of exporting that information; otherwise, you’ll be out of luck.
SMS and MMS logs, while not transferrable, are in theory rescuable, depending on what kind of smartphone you own, but it requires a lot of legwork on your end. You won’t be able to add them to your new iPhone, however; you’ll simply be saving them to your computer. There are a variety of different programs available for exporting messages from your smartphones—SMS Backup & Restore for Android appears to be one popular option. As I haven’t used it, I can’t personally recommend it, but you can always search Google to bring up more options.
If you’re upgrading from a feature phone

Yes, it’s finally time to toss that Razr aside for something a little more full-featured. But what about your contacts and your photos? If you’re on a phone with a nano-SIM card, it’s easy enough to rescue the first; for the second, you’ll need Bluetooth support or a connection cable for your device.
You can transfer your contacts one of two ways. If your old device uses a nano-SIM card, you can copy all your contacts to its SIM; once you’ve set up your iPhone 5, you can copy those contacts by swapping out your iPhone’s card with your old nano-SIM and heading to Settings > Mail, Contacts, Calendars > Import SIM Contacts. Once the import has completed, eject your old SIM and put the one that came with the iPhone 5 back in its tray. (If you’re worried about doing this yourself, you can always head down to your nearest Apple Store—any employee should be able to do it for you.)
If your phone has a SIM card that doesn’t fit in the iPhone 5, but it comes with a USB cable for connecting it to your computer, you may be able to transfer your contacts (and your photos) by exporting them through software. (This, obviously, depends on your phone; check its manual or do a Google search for specific transfer information.)
Activate your iPhone 5
If you purchased your iPhone in the Apple Store, you may have already activated it with a Specialist by your side. But if you’ve received your new gadget in the mail, or you opted not to activate immediately, here’s a guide on how to do so.
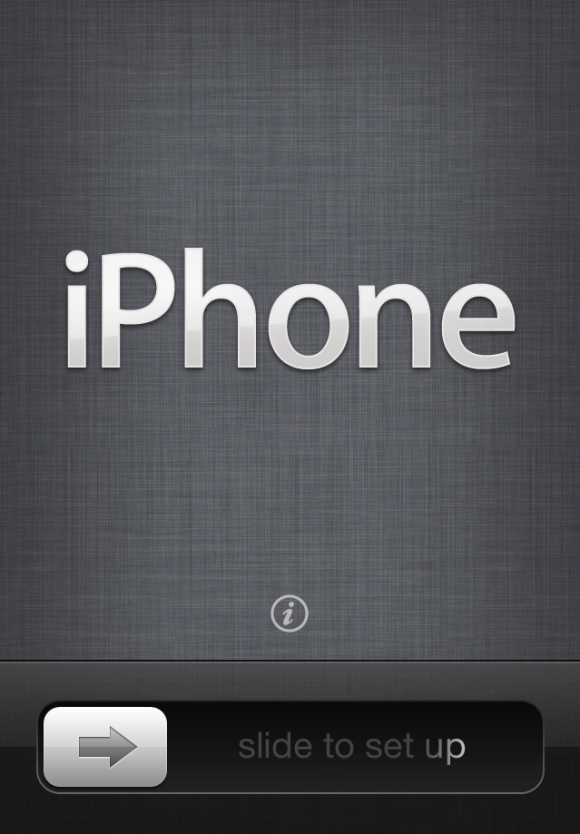 Set Me Up: To begin the activation process, move the slider to the right.
 Unbox your iPhone and turn it on by pressing the On/Off switch. A welcome screen greets you, displaying a Slide To Set Up slider that rotates between different languages. (If you need quick access to your device’s IMEI or ICCID number without setting up the phone, you can tap the information button [represented by a lowercase i] located directly above the slider.)
Once you begin the activation process, you’re asked to pick your language and country, and whether you’d like to enable Location Services. This allows Apple apps (and third-party apps) to access your location via Wi-Fi networks and your GPS (Global Positioning System) location. Your iPhone then checks for any Wi-Fi networks in the area that your phone can connect to; if there aren’t any, or if you’d rather use your cellular service, just tap the Next button.
From here, you can set up your device as a brand-new phone or, if you’re upgrading from an old iPhone, you can restore your data from an iCloud or iTunes backup.
Restore from an iCloud backup
 Choose Your Own: You can set up your new iPhone as a blank slate or restore it from a backup.
 If you have an iCloud account and have backed up a previous iPhone or iPod touch incarnation using iCloud’s Backup feature, you can use this backup to restore your data to your new iPhone (though you’ll need to be on a Wi-Fi network to do so). To restore your data, sign in to your iCloud account; agree to Apple’s terms and conditions; and then choose which backup file you’d like to use, and tap the blue Restore button in the top right corner of the screen. (Depending on the speed of your Wi-Fi connection, this process can take anywhere from a few minutes to a few hours.)
Restore from an iTunes backup
If you tap Restore From iTunes Backup, you’re brought to the Connect To iTunes screen. Connect your iPhone to your computer and open iTunes; after clicking your device in the source list, you’ll see the Set Up Your iPhone screen, which asks if you’d like to set it up as a new iPhone or restore from a specific backup. Choose the correct backup, and click the Continue button to proceed. This process is significantly faster than restoring from iCloud, because you’re transferring data over USB, not over Wi-Fi.
Add an Apple ID
If you choose to set up your iPhone as a new device—or after you choose an iCloud backup to restore from—the first thing you have to do is supply an Apple ID, or create one if you don’t have one. If you’ve ever purchased something from the iTunes Store, you’ve signed up for an Apple ID (it’s usually your primary email address). Your login information for Apple’s iCloud service should also work for signing in.
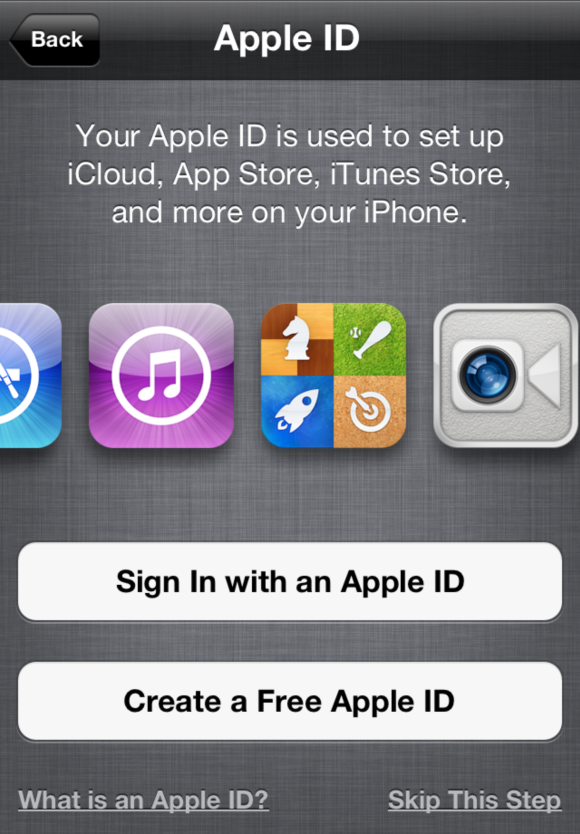 Email Identification: Your Apple ID is an email address: one you already use or a new email you create on the spot.
 Use your current Apple ID: Already have an Apple ID? Tap the Sign In With An Apple ID button and enter your username (usually your email address) and password. Apple then spends a few moments linking your device to your Apple ID.
Sign up for a new Apple ID: If you don’t have an Apple ID, it’s easy enough to create one by tapping the Create A Free Apple ID button. You need to enter your birthday, name, email address (or create a new iCloud email address), a password, a security question (in case you forget your password), and whether you’d like to receive email updates from Apple. Once you’ve entered all your information, you’re asked to read and agree to the terms and conditions, and Apple then registers your Apple ID.
No Apple ID for me: If you’d rather not set up an Apple ID, you can tap the Skip This Step link in the lower right corner. You can always add or create one from the Settings app later, but note that you won’t be able to buy anything from the iTunes Store or set up iCloud until you do.
Once you’ve set up an Apple ID, you can also set up iCloud on your device. iCloud is an umbrella term for Apple’s collection of syncing services, and it allows you to sync your photos, apps, contacts, calendars, reminders, notes, and mail across multiple devices.
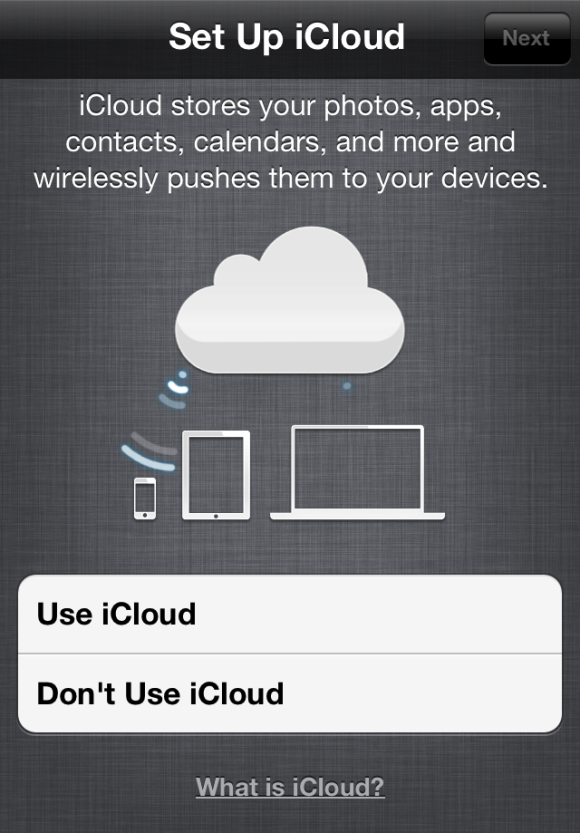 Send to the Cloud: Enable iCloud to sync your device.
 Choose to set up iCloud, and you’re first asked whether you’d like to enable iCloud backups for your iPhone. If you do so, you can have your device back up all essential settings to your iCloud account; if you ever need to restore, you can do so over Wi-Fi without an additional computer. You can also elect to use iTunes to back up your iPhone to your computer.
Additionally, you’re asked whether you’d like to opt in to iCloud’s Find My iPhone service. This enables location monitoring for your device, allowing you to find it using your Apple ID and the Find My iPhone app, should it go missing.
Finishing Touches
One of the iPhone’s nice features is Apple’s personal voice assistant, Siri. If you want to take advantage of Siri, you can enable it here. Then, once you finish the setup process, you’re asked if you’d like to send Apple anonymous diagnostics and usage information (similar to a desktop crash report). After you answer that question, your iPhone will be all set and ready for you to begin using.
Get started with your iPhone 5
Now that your device is up and running, here are a few quick pointers.
Tweak your settings: Most of the underlying system information for your new iPhone—network settings, Mail, sounds, messages, restrictions, wallpaper, and more—is kept in the Settings app. As such, it’s a good place to start when you’re first getting acquainted with your device.
Set up iTunes sync: If you didn’t restore from an older iOS backup, you won’t have any music, video, podcasts, photos, or books on your iPhone. You can remedy that by connecting it with your iTunes library: Just plug your device into your computer via its included USB cable. (Once you’ve completed this initial sync, you can also set up wireless local syncing; check out our guide for more information.)
 App Hunt: Search for interesting third-party apps via the App Store.
 Explore the App Store: Your iPhone comes with a bunch of cool built-in apps, but you may want to reach outside the sandbox for more interesting fare. The App Store, which you can access on your device or via iTunes on your computer, features more than 750,000 downloadable apps. To explore the store on your iPhone, tap the blue App Store icon on your home screen. Featured and Charts are both great places to start looking for recommended apps, and you can search the entire App Store by tapping on the Search tab. As the iPhone 5 has different dimensions than previous generations of the iPhone, there may also be a collection in the App Store for apps optimized for your device. (Older apps will still run on the iPhone 5, but they'll do so with black bars at the top and bottom of your screen.)
Talk to Siri: If you chose to set up Siri on your iPhone 5 during the activation process, you’re just one Home button press away from having your first conversation. Siri can help you book appointments, find restaurants, look up the weather, talk sports, and occasionally whip out snarky quips about robotic AI. To start, press and hold your Home button; the Siri interface will appear, along with a few suggested phrases to get going.
What to do with your old device
Now that you’ve managed to transfer your old information, set up your new iPhone 5, and start using it, it’s time to figure out what you’d like to do with your old device. If you’re interested in selling, recycling, or passing it along to a friend or family member, Macworld contributor Joel Mathis whipped up a handy guide that contains the steps you’ll need. But what if you’re interested in keeping it around?
Turn your iPhone into an iPod touch: No, your old iPhone won’t make calls or hop on a cellular network without a data plan, but you can keep using it as a Wi-Fi only iOS device. To do so, you’ll just need to keep the phone’s old SIM card (or a cheap SIM card from the same service provide you originally used to activate the phone with) inside it. From there, you can restore it to factory settings, and set it up as a brand new device.
DIGITAL JUICE
No comments:
Post a Comment
Thank's!