N.B. If you don’t know anything about WinJS, take a moment to peruse this primer. Also, the context of this post is the p&p Hilo project.
One of the first questions we’ve been struggling with is how to best test a WinJS app. (I’m going to use the term “unit test” somewhat loosely. Some of our tests would technically be classified as “integration tests”.)
Where to run the tests
Our first barrier to unit testing a WinJS app was finding a convenient way to run the tests.
The primary difficulty is that the WinRT APIs are only available in the context of a Windows 8 app (and that’s also practicially the case for WinJS as well). So if your tests need to touch either one, the only choice you currently have is to run the tests inside a Windows 8 app.
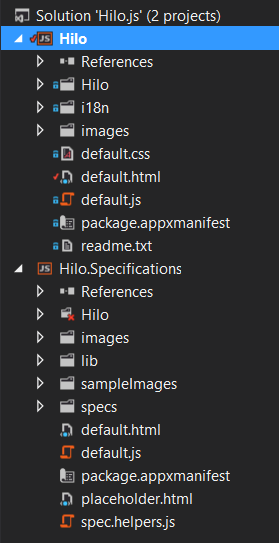
After some experimentation, we choose to include a second app in our solution to host the unit tests. (At one point, we had the tests embedded in the actual app itself; executing them with a hidden keyboard shortcut.) Having two apps means that we have to share the source that’s under test. Currently, we’re just manually linking the files. I also have to manually go into the default.html and add references to the scripts. Ultimately, I’d like to have this automated, but that’s a task for another day.
Notice in the screen shot of the solution explorer, that the
Hilo folder in the Hilo.Specifications project has a little red x. This is because the folder doesn’t physically exist there. Instead, there are just links to the corresponding files in the main Hilo project.
How to run the tests
We settled on Mocha for running our unit tests. Mocha is popular in the Node.js and it has (in my opinion) one of the better async test stories. This is really important when building Windows 8 apps because (much like Node.js) all the APIs are asynchronous.
We also choose to use a BDD-style for the tests. However, Mocha supports several styles, including a QUnit style.
Mocha will pass a function into your tests for you to call once the asynchronous work is complete. For example:
it('test something asynchronous using a promise', function(done) {

    doSomeWork().then(function(result){

        if(!result) { // or whatever assertion is appropriate
            throw new Error('test failed')
        } else {
            done(); // we call the function after the async work is complete
        }

    });
});
If you don’t understand the call to
then, take a moment to read about async programming in WinJS apps.What’s great about Mocha is that if you omit the
done parameter, then the harness automagically assumes the test is synchronous. Very nice.We did have one problem with Mocha. It has an internal recursive process that can cause a stack overflow in IE. Derick Bailey came up with a quick workaround by reseting the stack before each test with a call to
setTimeout in our test helper script.beforeEach(function (done) {
setTimeout(done, 0);
});
As mentioned before, Mocha is primarly for Node. However Mocha’s creator TJ Holowaychuk, graciously allowed me to setup a Nuget package to make it easier for Windows developers to use Mocha.
Steps to install Mocha
- Right-click on the test project and select Manage Nuget Packages
- Seach for “mocha”
- Select “mocha for browsers” and click Install
- Open the default.html page and reference the scripts. They are located in the \lib folder. (see below)
- Open the default.js file and add
mocha.run()some where after app is ready.
In my default.html:
<link rel="stylesheet" type="text/css" href="/lib/mocha.css">
<script src="/lib/mocha.js"></script>
 <!-- choose the style that you want for tests first -->
<script>mocha.setup('bdd')</script>

<!-- then reference your actual test script -->
A simplified default.js might be:
(function () {
    'use strict';

    var activation = Windows.ApplicationModel.Activation,
        app = WinJS.Application,
        nav = WinJS.Navigation;

    app.addEventListener('activated', function (args) {
        if (args.detail.kind === activation.ActivationKind.launch) {
            args.setPromise(WinJS.UI.processAll().then(function () {
                mocha.run();
            }));
        }
    }, false);

    app.start();
})(this);
What to mock?
The next big question was about making our code “testable”. I don’t like saying that because, in general, we don’t want test concerns to be bleed into the code. (I have some personal principles about these sorts of practices.)
At first, I tried to create a system that would completely mock out every WinRT API. I modeled it after CommonJS Modules. In essence, I made every “module” in my app use a
require function to locate its dependencies. Using this approach you had to reference the WinRT API in the very unnatural form of:var knownFolders = require('Windows.Storage.KnownFolders');
instead of the standard:
var knownFolders = Windows.Storage.KnownFolders;
This made it easy (ish) to mock out the WinRT call in my tests. However, there were a number of negatives to this approach. Mostly, it added an extra layers of complexity and it broke tooling (such as Intellisense and code navigation).
Instead, we decided to take a more functional approach to our code. As much as was reasonable, we tried to write our code as functions with inputs instead of as objects with dependencies. Then in our tests we could invoke the functions passing in “mocks” that were shaped like the necessary WinRT dependencies. This mean that we had thin layers in our app that invoked the functions and passed in the necessary bits. It also meant that in a few cases, we had to run tests against the actual WinRT objects. (Technically, I would call these “integration” tests instead of “unit” tests).
The best example of this approach in the HiloJS project (so far) can be found in tileUdater.js. In that file, we create a simple object that coordinates the real work using a set of functions. The major functions are defined in their own files (all inside the \Hilo\Tiles folder). We “export” these functions using
WinJS.Namespace.define. Exporting them makes them available to the code in tileUpdater.js as well as our tests.
Summary
So far this arrangement has worked really well for us. Working with Mocha has been a lot of fun. The test authoring experience isn’t quite as smooth as I’d like, but I’m sure that will come as we gain more experience.
Remember though, this project is very much a journey, so keep on eye on the project site. We’ll be writing more about it as we learn.
As always, your feedback is greatly desired. Do you have a better way? How does this approach strike? Feel free to speak up our the project’s discussion board.
Comment on this post at dev.bennage.com
DIGITAL JUICE
No comments:
Post a Comment
Thank's!